lock Ram 1500 2014 Get to Know Guide
[x] Cancel search | Manufacturer: RAM, Model Year: 2014, Model line: 1500, Model: Ram 1500 2014Pages: 252, PDF Size: 6.74 MB
Page 6 of 252
VEHICLES SOLD IN CANADA
With respect to any vehicles sold in Canada, the name Chrysler Group LLC shall be
deemed to be deleted and the name Chrysler Canada Inc. used in substitution.
WARNING!
• Pedals that cannot move freely can cause loss of vehicle control and increasethe risk of serious personal injury.
• Always make sure that objects cannot fall into the driver foot well while the
vehicle is moving. Objects can become trapped under the brake pedal and
accelerator pedal causing a loss of vehicle control.
• Failure to properly follow floor mat installation or mounting can cause inter-
ference with the brake pedal and accelerator pedal operation causing loss of
control of the vehicle.
• Never leave children alone in a vehicle, or with access to an unlocked vehicle.
Allowing children to be in a vehicle unattended is dangerous for a number of
reasons. A child or others could be seriously or fatally injured. Children should
be warned not to touch the parking brake, brake pedal or the shift lever/gear
selector.
• Never use the ‘PARK’ position as a substitute for the parking brake. Always apply the parking brake fully when parked to guard against vehicle movement
and possible injury or damage.
• Refer to your Owner's Manual on the DVD for further details.
INTRODUCTION/WELCOME
4
Page 9 of 252
11. Switch Panel• Diesel Exhaust Brake
• Tow/Haul pg. 138
• Electronic Stability Controlpg. 169
• Air Suspension System
• ParkSense
®Rear Park Assist
pg. 46
• Front Heated Seats pg. 27
• Front Ventilated Seats pg. 28
• Heated Steering Wheel pg. 30
• Integrated Trailer Brake Module pg. 138
• Engine Stop Start 12. Power Inverter Outlet pg. 123
13. Glove Compartment
14. Power Outlet
15. Shifter
16. Hood Release (below steering
wheel at base of instrument
panel) pg. 198
17. Parking Brake Release
18. Power Windows
19. Power Door Locks
20. Power Mirrors
CONTROLS AT A GLANCE
7
Page 10 of 252
INSTRUMENT CLUSTER
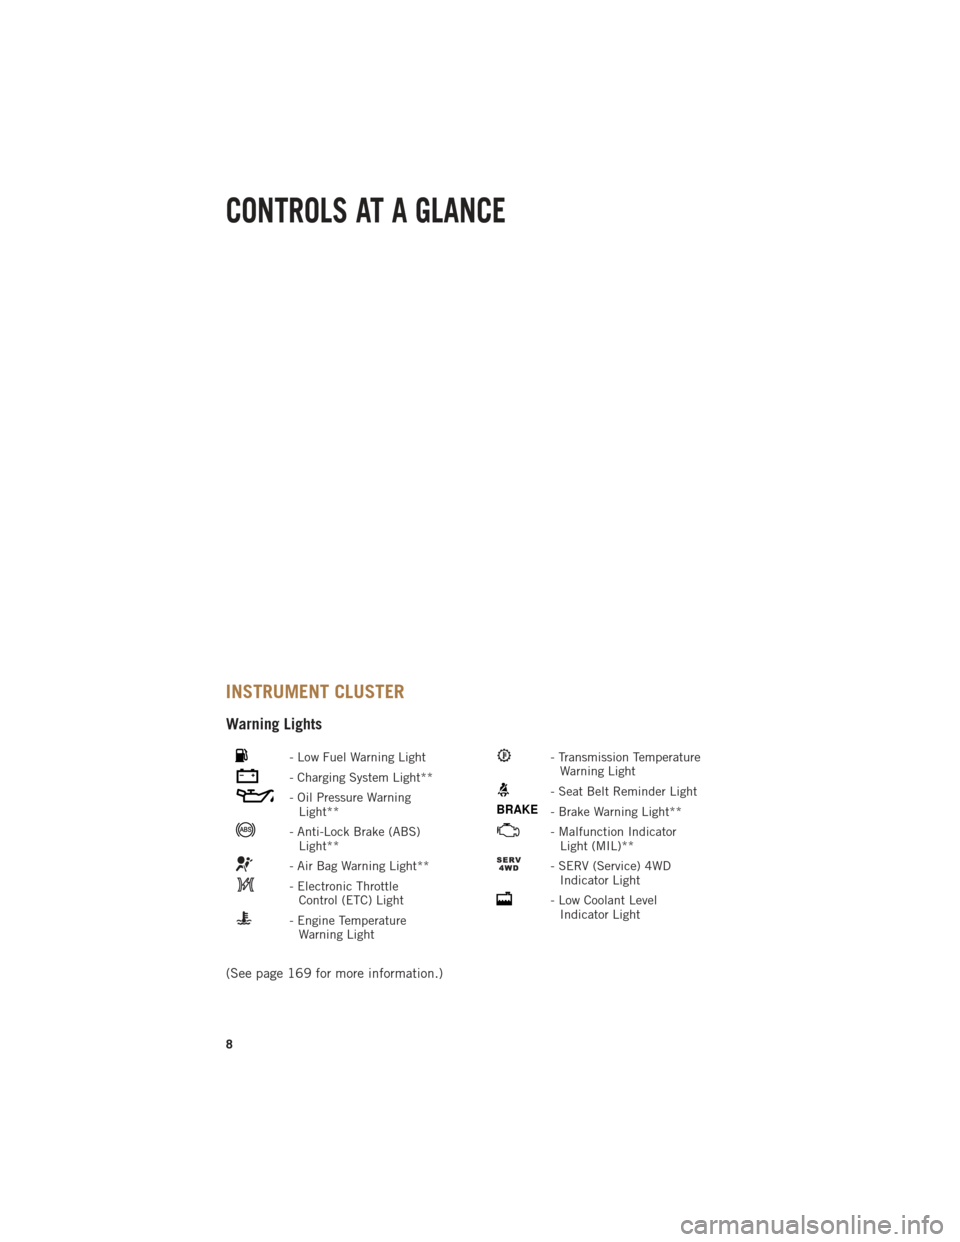
Warning Lights
- Low Fuel Warning Light
- Charging System Light**
- Oil Pressure WarningLight**
- Anti-Lock Brake (ABS)Light**
- Air Bag Warning Light**
- Electronic ThrottleControl (ETC) Light
- Engine TemperatureWarning Light
- Transmission TemperatureWarning Light
- Seat Belt Reminder Light
BRAKE- Brake Warning Light**
- Malfunction IndicatorLight (MIL)**
- SERV (Service) 4WDIndicator Light
- Low Coolant LevelIndicator Light
(See page 169 for more information.)
CONTROLS AT A GLANCE
8
Page 12 of 252
KEY FOB
This feature allows the driver to operate the
ignition switch with the push of a button,
as long as the Remote Keyless Entry (RKE)
transmitter is in the passenger compart-
ment.
The Keyless Ignition Node (KIN) has four
operating positions, three of which are
labeled and will illuminate when in posi-
tion. The three positions are OFF, ACC,
and ON/RUN. The fourth position is
START, during start RUN will illuminate.
NOTE:
In case the ignition switch does not change
with the push of a button, the RKE trans-
mitter (Key Fob) may have a low or dead
battery. In this situation a back up method
can be used to operate the ignition switch.
Put the nose side (side opposite of the
emergency key) of the Key Fob against the
ENGINE START/STOP button and push to
operate the ignition switch.
The Wireless Ignition Node (WIN) operates
similar to an ignition switch. It has four
operating positions, three with detents
and one that is spring-loaded. The detent
positions are OFF, ACC, and ON/RUN. The
START position is a spring-loaded momen-
tary contact position. When released from
the START position, the switch automati-
cally returns to the ON/RUN position.
NOTE:
If your vehicle is equipped with Keyless
Enter-N-Go™, the Electronic Vehicle Infor-
mation Center (EVIC) will display the
ignition switch position (OFF/ACC/RUN).
Refer to “Electronic Vehicle Information
Center (EVIC) — If Equipped” in “Under-
standing Your Instrument Panel” for fur-
ther information.
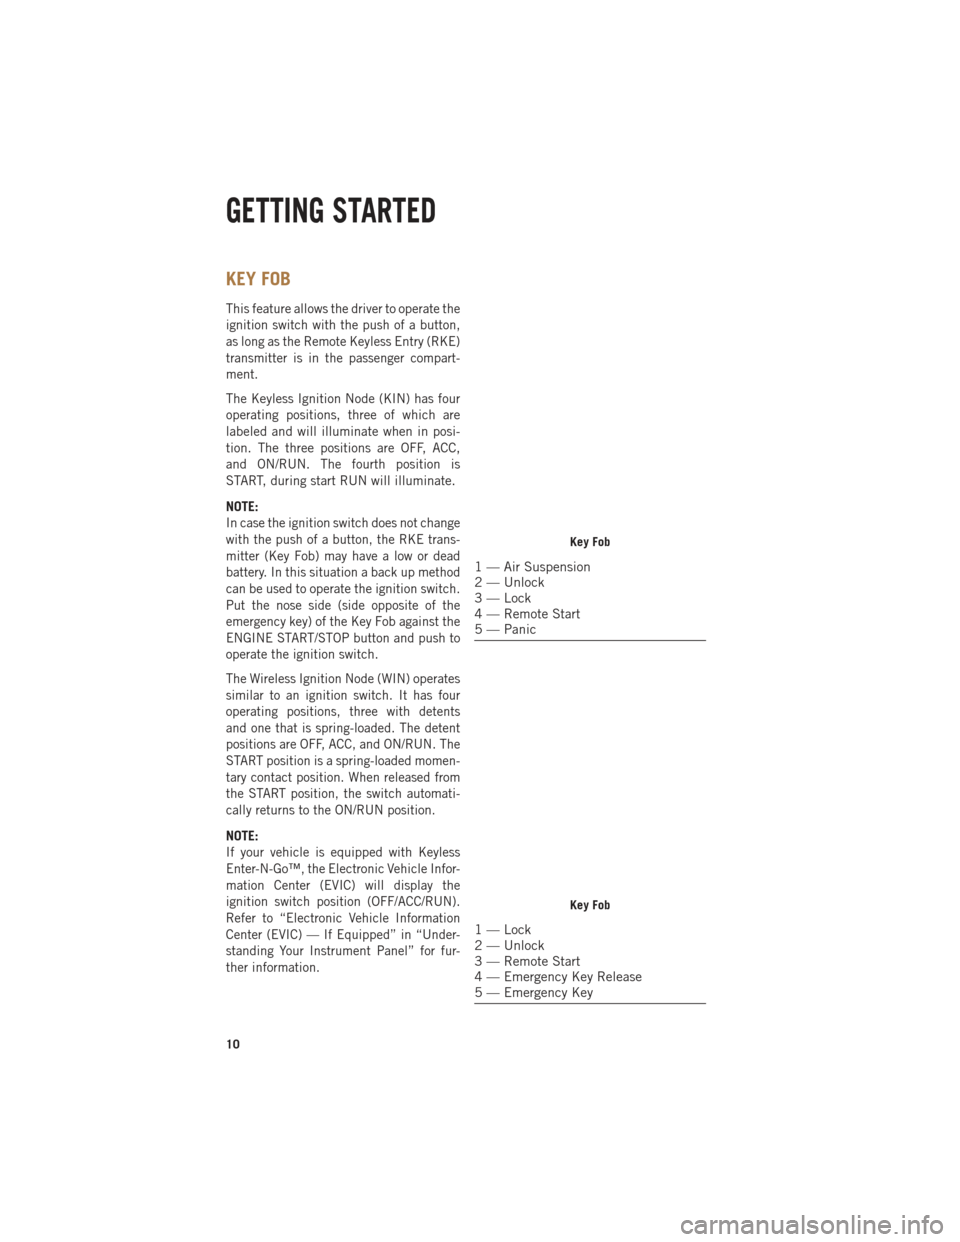
Key Fob
1 — Air Suspension
2 — Unlock
3 — Lock
4 — Remote Start
5 — Panic
Key Fob
1 — Lock
2 — Unlock
3 — Remote Start
4 — Emergency Key Release
5 — Emergency Key
GETTING STARTED
10
Page 13 of 252

Locking And Unlocking The Doors
•Press and release the UNLOCK button on the RKE transmitter once to unlock the
driver’s door. Press the UNLOCK button twice within five seconds to unlock all doors
and the tailgate and the RamBox
®(if equipped). The turn signal lights will flash to
acknowledge the unlock signal. The illuminated entry system will also turn on.
NOTE:
The EVIC can be setup for driver door first, otherwise this will unlock all doors.
All doors can be programmed to unlock on the first press of the UNLOCK button.
Refer to Programmable Features in this guide.
Panic Alarm
• Press the PANIC button once to turn the panic alarm on.
• Wait approximately three seconds and press the button a second time to turn the panic alarm off.
RKE Air Suspension (Remote Lowering Of Vehicle) — If Equippedx2
• This vehicle is equipped with a feature that can lower the vehicle to a height which
will improve ease of passenger entry/exit and cargo loading/unloading. The feature
is accessed by pressing the air suspension lowering button twice on the key fob.
• When remote key fob lowering is requested the vehicle will send a series of chirps and flashes to alert the customer that the operation has begun and will continue
these alerts until it successfully lowers.
• If the feature is unable to lower the vehicle due to certain conditions not being met, the horn will chirp twice and the vehicle will not lower.
Emergency Key
Should the battery in the vehicle or the Key Fob transmitter go dead, there is an emergency
key located in the Key Fob that can be used for locking and unlocking the doors.
•To remove the emergency key, slide the button on the Key Fob with your thumb and
then pull the key out with your other hand.
WARNING!
• Never leave children alone in a vehicle, or with access to an unlocked vehicle. Allowing children to be in a vehicle unattended is dangerous for a number of
reasons. A child or others could be severely injured or killed. Children should
be warned not to touch the parking brake, brake pedal, or the shift lever. Do not
leave the Key Fob in or near the vehicle, or in a location accessible to children,
and do not leave the ignition of a vehicle equipped with Keyless Enter-N-Go™
in the ACC or ON/RUN mode. A child could start the vehicle, operate power
windows, other controls, or move the vehicle.
• Do not leave children or animals inside parked vehicles in hot weather. Interior
heat build-up may cause them to be severely injured or killed.
GETTING STARTED
11
Page 14 of 252

KEYLESS ENTER-N-GO™
The Keyless Enter-N-Go™ system is an enhancement to the vehicle's Key Fob. This
feature allows you to lock and unlock the vehicle's door(s) without having to press the
Key Fob lock or unlock buttons, as well as starting and stopping the vehicle with the
press of a button.
To Unlock From The Driver Or Passenger Side:
•With a valid Keyless Enter-N-Go™ Key
Fob located outside the vehicle and
within 5 ft (1.5m) of the driver or pas-
senger side door handle, grab either
front door handle to unlock the door
automatically.
To Lock The Vehicle’s Doors
• With a valid Keyless Enter-N-Go™ Key Fob transmitter within 5 ft (1.5 m) of
the driver or passenger front door
handles, press the door handle LOCK
button to lock all doors.
DO NOT grab the door handle, when pressing the door handle lock button. This could
unlock the door(s).
NOTE:
• After pressing the door handle LOCK button, you must wait two seconds before you can lock or unlock the doors, using either Passive Entry door handle. This is
done to allow you to check if the vehicle is locked by pulling the door handle
without the vehicle reacting and unlocking.
• The Passive Entry system will not operate if the RKE transmitter battery is dead.
The vehicle doors can also be locked by using the RKE transmitter lock button or the
lock button located on the vehicles interior door panel.
GETTING STARTED
12
Page 15 of 252
Engine Starting/Stopping
Starting
With a valid Keyless Enter-N-Go™ Key Fob
inside the vehicle:
1. Shift the transmission into PARK orNEUTRAL.
2. While pressing the brake pedal, press the ENGINE START/STOP button
once. If the engine fails to start, the
starter will disengage automatically
after 10 seconds.
3.
To stop the cranking of the engine prior to the engine starting, press the button again.
NOTE:
In case the ignition switch does not change with the push of a button, the RKE
transmitter (Key Fob) may have a low or dead battery. In this situation a back up
method can be used to operate the ignition switch. Put the nose side of the Key Fob
(side opposite of the Emergency Key) against the ENGINE START/STOP button and
push to operate the ignition switch.
Stopping
1. Bring the vehicle to a complete stop.
2. Shift the transmission to PARK (P).
3. Push the ENGINE START/STOP button once. The ignition switch will return to the OFF position.
NOTE:
If the transmission is not in PARK and the vehicle is in motion, the ENGINE START/STOP
button must be held for two seconds with the vehicle speed above 5 mph (8 km/h) before
the engine will shut off.
REMOTE START
• Press the REMOTE START buttonx2on the Key Fob twice within five seconds.
Pressing the REMOTE STARTx2button a third time shuts the engine off.
• To drive the vehicle, push and release the UNLOCK button on the RKE transmitter to unlock the doors and disarm the Vehicle Security Alarm System (if equipped).
Then, press and release the START/STOP button.
With Remote Start, the engine will only run for 15 minutes (timeout) unless the
ignition is cycled to the ON/RUN position.
The vehicle must be started with the Key Fob after two consecutive timeouts.
GETTING STARTED
13
Page 16 of 252

WARNING!
• Do not start or run an engine in a closed garage or confined area. Exhaust gascontains Carbon Monoxide (CO) which is odorless and colorless. Carbon
Monoxide is poisonous and can cause you or others to be severely injured or
killed when inhaled.
• Keep Key Fob transmitters away from children. Operation of the Remote Start
System, windows, door locks or other controls could cause you and others to be
severely injured or killed.
VEHICLE SECURITY ALARM
To Arm:
• Lock the door using either the power door lock switch (one door must be open) orthe LOCK button on the Remote Keyless Entry (RKE) transmitter (doors can be
open or closed), and close all doors.
NOTE:
The Vehicle Security Alarm will not arm if you lock the doors with the manual door
lock plungers.
The Vehicle Security Light in the instrument cluster will flash for 16 seconds. This
shows that the Vehicle Security Alarm is arming. During this period, if a door is
opened, the ignition is cycled to ON/RUN, or the power door locks are unlocked in any
manner, the Vehicle Security Alarm will automatically disarm.
NOTE:
Once armed, the Vehicle Security Alarm disables the unlock switch on the driver door
trim panel and passenger door trim panel.
To Disarm The System:
• Push the Key Fob UNLOCK button or cycle the ignition to the ON/RUN position.
The Vehicle Security Alarm is designed to protect your vehicle; however, you can create
conditions where the Vehicle Security Alarm will give you a false alarm. If one of the
previously described arming sequences has occurred, the Vehicle Security Alarm will
arm regardless of whether you are in the vehicle or not. If you remain in the vehicle and
open a door, the alarm will sound. If this occurs, disarm the Vehicle Security Alarm.
If the Vehicle Security Alarm is armed and the battery becomes disconnected the
Vehicle Security Alarm will remain armed when the battery is reconnected. The exterior
lights will flash, and the horn will sound. If this occurs, disarm the Vehicle Security
Alarm.
GETTING STARTED
14
Page 20 of 252

Crew/Mega/Quad Cab Full Or Split Bench Seat
•The lower anchorages are round bars that are found at the rear of the seat
cushion where it meets the seatback. They are just visible when you lean into the
rear seat to install the child restraint. You will easily feel them if you run your finger
along the gap between the seatback and seat cushion.
•
In addition, Regular Cab models
have tether strap anchorages behind
the front center and right seats. Quad
Cab, Mega Cab and Crew Cab models
have tether strap anchorages located
behind each of the rear seats.
Standard/Crew/Quad Cab Full Bench
Seat
•Do not install a child restraint in the
center position using the LATCH system.
Use the seat belt and tether anchor to
install a child seat in the center seating position.
Crew/Quad/Mega Cab Split Bench Seat
• If a child restraint installed in the center position blocks the seat belt webbing or buckle for the outboard position, do not use that outboard position. If a child seat
in the center position blocks the outboard LATCH anchors or seat belt, do not
install a child seat in that outboard position.
Installing The Child Restraint Using The LATCH Lower Anchors
NOTE:
Never “share” a LATCH anchorage with two or more child restraints.
1.
Loosen the adjusters on the lower straps and on the tether strap of the child seat so
that you can more easily attach the hooks or connectors to the vehicle anchorages.
2. Attach the lower hooks or connectors of the child restraint to the lower anchorages in the selected seating position.
3. If the child restraint has a tether strap, connect it to the top tether anchorage. See below for directions to attach a tether anchor.
4. Tighten all of the straps as you push the child restraint rearward and downward into the seat. Remove slack in the straps according to the child restraint
manufacturer’s instructions.
5. Test that the child restraint is installed tightly by pulling back and forth on the child seat at the belt path. It should not move more than 1 inch (25.4 mm) in any
direction.
GETTING STARTED
18
Page 21 of 252

Installing The Child Restraints Using The Vehicle Seat Belts (Standard Cab)
• The seat belts in the passenger seating positions are equipped with a SwitchableAutomatic Locking Retractor (ALR) that is designed to keep the lap portion of the
seat belt tight around the child restraint. Any seat belt system will loosen with
time, so check the belt occasionally, and pull it tight if necessary.
Installing The Child Restraints Using The Vehicle Seat Belts
(Crew/Quad/Mega Cab)
• The seat belts in the outboard passenger seating positions are equipped with aSwitchable Automatic Locking Retractor (ALR). The center seating positions are
equipped with a cinching latch plate. Both types of seat belts are designed to keep
the lap portion of the seat belt tight around the child restraint. Any seat belt system
will loosen with time, so check the belt occasionally, and pull it tight if necessary.
Crew/Quad Cab
• Always use the tether anchor when using the seat belt to install a forward facing
child restraint, up to the recommended weight limit of the child restraint.
Standard/Mega Cab
• The Tether Anchor can be used with the seat belt until the combined weight of thechild and the child restraint is 65 lbs (29.5 kg). Use the seat belt without the
Tether Anchor once the combined weight is more than 65 lbs (29.5 kg).
To Install A Child Seat Using An ALR:
1. Pull enough of the seat belt webbing from the retractor to pass it through the belt
path of the child restraint. Do not twist the belt webbing in the belt path.
2. Slide the latch plate into the buckle until you hear a “click.”
3. Pull on the webbing to make the lap portion tight against the child seat.
4. To lock the seat belt, pull down on the shoulder part of the belt until you have pulled all the seat belt webbing out of the retractor. Then, allow the webbing to
retract back into the retractor. As the webbing retracts, you will hear a clicking
sound. This means the seat belt is now in the Automatic Locking mode.
5. Try to pull the webbing out of the retractor. If it is locked, you should not be able to pull out any webbing. If the retractor is not locked, repeat the last step.
6.
Finally, pull up on any extra webbing to tighten the lap portion around the child
restraint while you push the child restraint rearward and downward into the vehicle
seat.
7. If the child restraint has a top tether strap and the seating position has a top tether anchorage, connect the tether strap to the anchorage and tighten the tether strap.
See below for directions to attach a tether anchor.
8.
Test that the child restraint is installed tightly by pulling back and forth on the child
seat at the belt path. It should not move more than 1 inch (25.4 mm) in any direction.
GETTING STARTED
19